Uddiyana bandha looks difficult, especially if you have never seen it demonstrated before. However, it is much simpler to do than it looks. But it must be done correctly.
Definition
The Sanskrit word uddiyana means ‘to raise up’ or ‘to fly upwards’. The word bandha means to hold’, ‘tighten’ or ‘lock’. This practice is so called because the physical lock applied to the body causes the diaphragm to rise towards the chest. Another reason for the name is that the lock helps to direct prana into sushumna nadi so that it flows upwards to sahasrara. Sushumna nadi is the subtle pranic pathway within the spine which passes through the main psychic centres (chakras). The awakening of these centres implies a progressive expansion of awareness, until the cosmic awareness (sahasrara) is attained. This is why uddiyana bandha is useful for helping to expand awareness. For this purpose, it is systematically combined with specific pranayama practices.
Scriptural references
Uddiyana bandha is mentioned in a large number of scriptures. These include the Hatha Yoga Pradipika, the Gherand Samhita and the Baraha, Yoga Sikha, Yoga Kundalini, Dhyana Bindu, Yoga Tattva and Chudamani Upanishads. We don’t intend to give all of the quotations from these texts for they are very similar. We will merely give a few examples. The Hatha Yoga Pradipika gives the most detail: “That lock which causes the prana to fly up the sushumna is called uddiyana by all yogis.”
(3:55) “The practice to be described causes the bird (of prana) to fly upwards after taking a period of rest.” (3:56) In other words, the latent prana is directed into the sushumna.
“Drawing the abdomen backwards and upwards in the navel region is called uddiyana. It is the lion which challenges the elephant of death.” (3:57) That is, the practice helps to transcend normal states of awareness so that one gains insight into the nature of existence and mortality and the purpose of life.
“The practice of uddiyana bandha described by yogis is very easy to do. Regular practice makes even an old man youthful.” (3:58) Uddiyana bandha revitalizes the whole body and can help to lead to states of meditation that can make even an old man feel young.
In the Baraha Upanishad it says: “The breath follows life in the same way that a shadow follows an object. Uddiyana is the practice that makes the ever restless breath fly upwards …” “To practise uddiyana seriously, the diet should be good and taken in small quantities.” This last statement is particularly important if uddiyana is combined with regular and intense practices of pranayama.
Uddiyana Bandha – Position
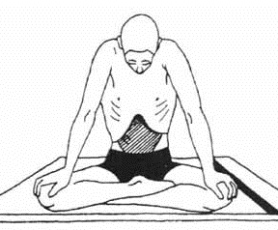
The best position in which to do uddiyana bandha is any meditational asana such as padmasana, siddhasana or siddha yoni asana. The important thing is that the knees rest firmly on the ground so that the final lock can be maintained correctly. This is also the position necessary for practising kriya yoga. If you cannot sit in any of these positions then you can sit in vajrasana1. But if this is the case, tben we advise you to regularly practise leg loosening exercises so that you can eventually sit in any meditational asana. This is important for kriya yoga.
Uddiyana bandha can also be done in a standing position. This will be described at the end of this topic.
Preparatory practice
An excellent preparatory practice for developing uddiyana bandha is agnisar kriya. If you can do agnisar kriya without the slightest difficulty then you should have no difficulty doing uddiyana bandha.
Technique
Sit in any meditational asana with the knees flat on the ground.
Place the palms of the hands flat on the knees; this is important to allow the arms to apply pressure in the final pose.
Close the eyes.
Relax the whole body.
Exhale as deeply as possible by accentuated contraction of the abdominal muscles and the chest; the lungs should be emptied as much as is possible.
Hold the breath outside.
Do jalandhara bandha.
Then try to take a false inhalation.
That is, expand the chest as though you are breathing in, but without actually allowing air to enter the lungs.
This false inhalation will automatically raise the diaphragm and enable the abdomen to become concave in shape, being raised inwards and upwards.
Note: there is no need to contract the abdominal muscles; in fact they should remain passive at this stage.
In this position the palms are pressed firmly against the knees and the arms straightened.
This is the final position.
Stay in the final pose for a comfortable length of time while holding the breath out.
Then slowly relax the chest; that is, release the false inhalation; this will automatically allow the abdomen to reassume its normal shape.
Then release jalandhara bandha and bend the arms.
Inhale slowly.
This is 1 round.
Repeat the process when the breathing has returned to normal.
Don’t strain under any circumstances.
Uddiyana Bandha – Points to remember during the practice:
• Try initially to empty the lungs as much as possible by accentuated contraction of the abdominal muscles and the chest.
• Make sure you apply jalandhara bandha before doing the final position of uddiyana. It is jalandhara that prevents air entering the lungs during the false inhalation.
• It is the false inhalation that gives the final contraction of the abdomen. The abdominal muscles should remain passive. Many people contract the abdominal muscles in the final position – this is wrong.
• Don’t allow air to enter the lungs when you make the false inhalation.
• When you release the final pose, firstly relax the chest then release jalandhara bandha and finally breathe in. This order is important to prevent injury to the lungs.
Breathing, awareness and duration
Take a deep exhalation before taking the final position. Hold the breath outside while taking the final position, while remaining in the final position and while returning to the starting position. Inhale on completion of the practice.
Beginners should be aware of doing the practice correctly and achieving perfect coordination between the various steps involved in taking the final position. When you have mastered the practice, be aware of the breathing process and mental counting in the final position. This applies especially if uddiyana is integrated with pranayama5.
You can practise as many rounds as you wish, but you must not strain. Beginners should do only a few rounds initially and then slowly increase the number when their system becomes accustomed to the practice.
The final position of each round should be held for as long as you can comfortably hold your breath.
Sequence
The best time to do uddiyana bandha in your practice program is after asanas and pranayama, and before meditational practice. Uddiyana can also be combined with pranayama and mudras.
Uddiyana Bandha – Time of practice
Early in the morning before breakfast is the best time.
Limitations
People who suffer from high blood pressure, heart problems, peptic or duodenal ulcers, colitis and other serious abdominal problems should not do this practice. Pregnant women should not do this practice, though they can perform it after childbirth to strengthen the abdominal muscles and reshape the abdominal area in general.
Precautions
The stomach must be empty before attempting this practice. Wait for four to five hours after eating your meal. If possible try to evacuate the bowels before doing the practice.
Benefits
The benefits are almost the same as for jalandhara bandha. The entire abdomen is squeezed like a sponge. This pushes out all the stagnant blood. All the inner organs are revitalized. It can help to alleviate or prevent a large number of abdominal ailments including indigestion, constipation, diabetes, colitis and so forth if they are not too serious and chronic.
The adrenal glands are regularized thereby giving energy to a lethargic person and relaxation to an anxious or overwrought person. The solar plexus is also normalized. This centre is sometimes called the abdominal brain and it is the centre of energy in the whole body. This centre directs the correct flow of energy to all the different organs.
Uddivana bandha normalizes this centre and thereby helps to regulate the energy level in the whole body.
In the final position the air in the lungs is pressurized by the upward movement of the diaphragm and the false inhalation. This helps to open out the alveoli in the lungs and improves lung efficiency. At the same time the heart is given a good massage, which improves its functional efficiency.
Uddiyana bandha also has many subtle influences on the pranic body. The navel is the area of the manipura chakra, which is the centre of prana in the body. Physical stimulation of this area has repercussions on the more subtle flows of prana and its distribution throughout the body. Uddiyana also redirects prana into the sushumna nadi. This helps to expand awareness and induces meditation.
Alternative technique
Uddiyana bandha can also be done in a standing position. This is generally easier for beginners. The technique is as follows: Stand with your feet about half a meter apart. Bend forwards and bend the legs slightly at the knees. Place your palms on the knees. Exhale deeply; try to empty the lungs as much as possible. Then bend your head downwards and press the chin against your chest in jalandhara bandha. Make sure your arms are straight. Then make a false inhalation (expand the chest as though breathing in, but not actually taking in air). Straighten the legs slightly. This movement will automatically draw the abdomen upwards and inwards to form uddiyana bandha. Hold this position for a comfortable length of time. Then release the expansion of the chest and bend the legs, release jalandhara bandha and finally breathe in.
This method gives basically the same benefits as uddiyana bandha performed in a sitting position. However, the sitting form is preferable because it is more suitable for combination with meditative and pranayama practices.
Abdominal malfunctions are common ailments among many people. The causes are often due to lack of exercise and inadequate massage of the internal organs. Many of us spend long periods of time sitting motionless doing office work, studying, watching television and other activities that require little or no physical effort. This leads to laziness and sluggishness of the entire body, including the abdominal organs. For this reason, the organs become inefficient and unable to perform their basic functions properly, leading to general bad health, whether conspicuous or inconspicuous.
Posture
One can assume various postures to perform this practice:
Standing position
Vajrasana
Padmasana
Those who are able should practise while sitting in vajrasana (or padmasana if they are familiar with it). Otherwise adopt a standing position, which is equally good.
AGNISAR KRIYA
Technique 1: in vajrasana
Sit in vajrasana. Separate the knees as widely as possible keeping the toes in contact with each other. Place the hands on the knees. Arch the spine backwards and straighten the arms. Bend the head slightly forward. Open the mouth and extend the tongue. The eyes can be open or closed, as you prefer. Then contract and expand the abdomen while simultaneously breathing in and out. This breathing should be passive; that is, it should only occur because you are accentuating the movement of the abdomen. The breathing should resemble the panting of a dog and must be in harmony with the asso-ciated abdominal movements. It is important that the internal organs receive a good massage.
Therefore contract and expand the abdomen as much as possible. Don’t strain. The movement of the abdomen should be rapid, but at the same time ensure that the contractions and expansions are as full as possible. Don’t do the practice over-rapidly, so that the movement of the abdomen is reduced and becomes superficial. This will reduce the benefits of the practice. Pull in and push out the abdomen for a short period of time, until you feel a little fatigue.
This is 1 round. Rest for a short time, then repeat.
Technique 2: in standing position
Stand with the legs about half a meter apart. Lean forwards and place your palms just above the knees. The arms should remain straight throughout the practice. Bend the knees slightly. Look towards your abdomen. Open your mouth and extend your tongue. Then contract and expand the abdomen while breathing in and out, in the same way as described in technique 1. Continue as long as you are able to without straining. Take a rest and then repeat the procedure.
Technique 3: advanced form
This technique gives the greatest massage of the abdominal organs. It can be practised in vajrasana, padmasana or a standing position. It is similar to techniques 1 and 2, but the breath is held while pulling in and pushing out the abdomen. Breathe in deeply. Then exhale, emptying your lungs as much as possible by fully drawing in the abdomen. Without breathing, try to push your abdomen outwards. Then contract your abdomen again. Repeat this process in quick succession as mam times as you can while holding your breath. Be careful not to strain yourself by holding your breath too long. Then breathe in. This is 1 round. Rest until the breathing returns to normal. When your breathing becomes normal again, repeat another round. The time of breath retention should be gradually increased over a period of days and weeks.
Mistakes to avoid
Often agnisar kriya is done with only a slight movement of the abdomen. This is often due to pulling in and pushing out the abdomen too quickly. Try to regulate your practice so that the movement is reasonably rapid, yet simultaneously exaggerated.
Sometimes in stages 1 and 2 the breath is not synchronized with the movement. Try to harmonize the breath with the movement and keep a constant rhythm throughout the practice.
Number of rounds and duration
Beginners may find this practice a little difficult because of lack of voluntary control over the abdominal muscles. Furthermore, you will quickly become tired because you are using
your abdominal muscles far more than usual. Therefore, you must slowly and gradually develop and accustom the muscles over a period of time. At first contract and expand the abdomen no more than twenty five times before taking a short rest. Three rounds is sufficient. Practise this for a week or so.
When your muscles become stronger then you can gradually increase the duration of each round as well as the number of rounds. We leave the details of this to the discretion of the practitioner, for the choice will depend on individual capability.
Of course, the duration of each round in technique 3 will depend on how long you can hold your breath. We emphasize again that you should not strain. You will find that the duration of breath retention will automatically increase with practice.
Time of practice
Do not practise agnisar kriya with a full stomach. Wait until three or four hours have elapsed after a meal. The best time to practise is early in the morning before breakfast, preferably after going to the toilet. However, if you wish you can do this practice before going to the toilet to help induce a good bowel movement.
Limitations
Those people with high blood pressure, heart problems, ulcers and hernias are advised not to do this kriya.
Women who are pregnant should also refrain from doing the practice. However, they definitely should recommence it after childbirth to tighten up the abdominal and pelvic muscles and bring the internal organs back to normal.
Benefits
Agnisar kriya massages all the abdominal organs, strengthens the muscles and stimulates the associated nerves, encouraging the best possible functioning of these organs. It promotes the correct secretion of digestive juices and thereby allows optimum assimilation of nutrients from the food that we eat. Furthermore, it prevents and removes various digestive maladies such as constipation, indigestion, hyperacidity, hypoacidity, flatulence and sluggishness of the liver, etc.
If a person has strong and efficient internal organs, he is far more able to avoid disease. Moreover, even if he mistreats his body the organs are easily able to cope with the situation and bring the body back into balance. Agnisar kriya strengthens the organs that lie in the lower part of the trunk. In this way it helps the individual to withstand the onslaught of disease and the general unhealthy conditions of everyday life. This is an important practice and we recommend everyone to try it on a regular basis